
[ad_1]
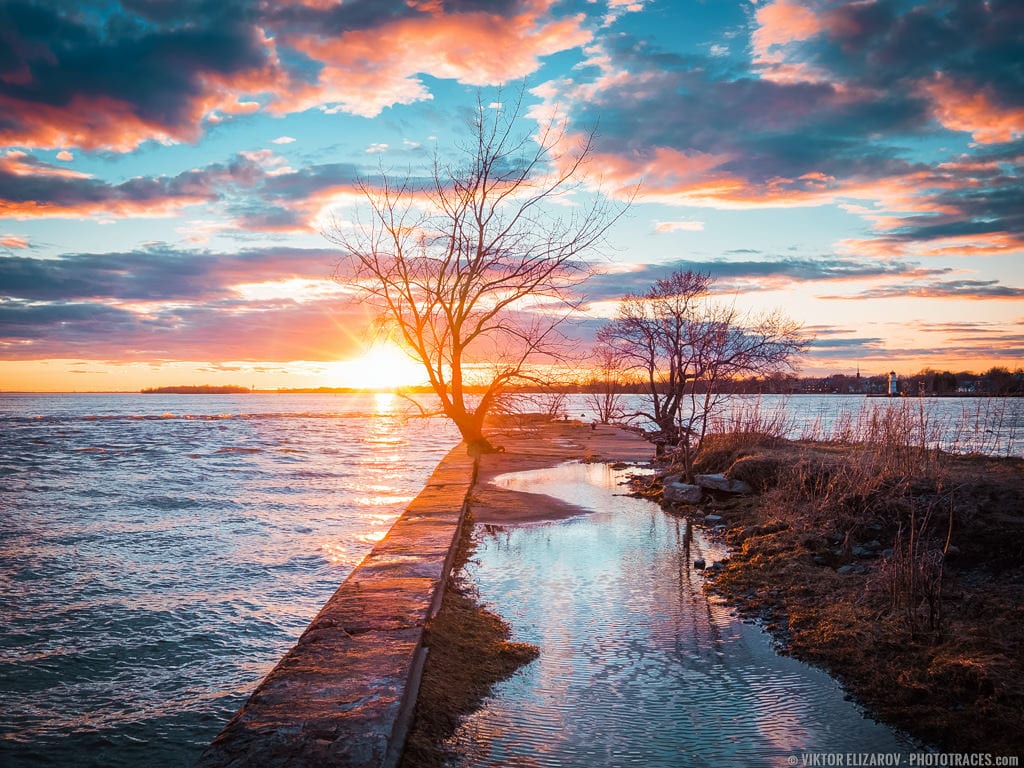
I had just one objective in thoughts once I determined to shoot sundown within the native park within the neighborhood of Montreal. I wished to place the X-Trans sensor of my new Fujifilm XT2 digicam to the check and take it to the restrict. I attempted to estimate the dynamic vary of the sensor, capturing straight into setting solar.
After years of shooing bracketed exposures for HDR with Canon and Sony cameras, I may see that the brand new Fujifilm X-Trans sensor was extra succesful. I wished to check if it was doable to keep away from HDR all collectively to make my workflow less complicated.
The Fujifilm XT2 carried out splendidly. I managed to seize the sundown scene capturing straight into the solar with out clipping highlights or shadows. All I wanted is one shot solely.
However by the tip of the day, I managed to realize two extra objectives I used to be unaware of in the beginning of my shoot.
After the rain, it was very windy, and I may see the potential to realize an thrilling composition by incorporating the reflections of the scene in breezy water. I deliberately didn’t use a tripod, avoiding lengthy exposures. I wished to freeze the movement of the breezy water. Producing an fascinating composition grew to become my second objective.
And at last, once I noticed the cloud formations and its colours, I acknowledged it could be an ideal alternative to take the Vary Masks instrument in Lightroom to its full prolong. I used one Vary Masks to highlights the pink areas of the sky and one other Vary Masks to reinforce the blue areas. It was objective #3
Taking pictures
The capturing itself was uncomplicated. I used to be capturing handheld in a single capturing mode with out bracketing.
The problem was to give you an fascinating composition as a result of the house on the previous pier was minimal, and I couldn’t completely align the solar, two timber, and the lighthouse within the background. However I did my greatest.
Digital camera: Fujifilm X-T2
Lens: Fujinon 10-24mm
Focal Size: 22m (Hyperfocal distance: 3m)
Taking pictures Mode: Aperture Precedence (A)
ISO: 200
Aperture: F/8
Shutter Pace: 1/110s
Tripod: handheld
Modifying & Processing
It was a single RAW processing workflow.
Lightroom (80%)
My first objective was to enhance the composition. I used the Crop Overy instrument to make composition tighter. Subsequent, I modify the unique facet ratio 3 x2 to 4 x 3.
I used the Napa preset from my Journey Professional Package Assortment (coming quickly) as the bottom for Lightroom Fast Modifying. Then I used TOOLKIT to spice up the Publicity and open Shadows.
The Lightroom Preset Modifying Components: Napa (1, 8, 23, 32)
I created 2 Graduated Filters, one for the pink highlights of the sky and one other for the blues of the sky. I utilized the Rnage Masks on every Graduated filter to maximise selective concentrating on.
You may study extra about superior use of the Vary Masks in my intensive tutorial right here: Lightroom Vary Masks: Superior Luminosity and Shade Masking in Lightroom
Photoshop (20%)
In Photoshop, I cleaned up the picture by eradicating particles within the foreground with the assistance of the Stamp Device. On the very finish, I decreased the digital noise. I used the Topaz DeNoise plugin.
Whole time: 20min
Earlier than & After Transformation

[ad_2]