
[ad_1]
When an aspiring photographer asks me one of the simplest ways to enhance a panorama {photograph}, I at all times give the identical images tip with none hesitation: “Be certain that the horizon is at all times straight in your panorama images.”
The simplest approach to preserve the horizon straight in {a photograph} is to have a Bubble Degree connected to your digicam or utilizing the Gridlines in your digicam’s LCD display. Finally, you’ll be able to straighten the horizon in Lightroom throughout post-processing with the assistance of the Crop Overlay device.

The Horizon and Panorama Images
There are a number of other ways to enhance your panorama photographs, however a straight horizon works on a extra primary stage and goes past logic and creative expression.
From the second we’re born and all through our lives, all our experiences affirm the basic rule that the horizon is at all times horizontal in nature. This truth is imprinted in our brains.
After we see {a photograph} with a horizon that’s crooked even barely by a couple of levels, the mind merely rejects it. If a viewer isn’t images savvy, she or he gained’t be capable to clarify why they don’t just like the photograph—the rejection works on a unconscious stage.
That is the explanation that the primary and most basic rule of panorama images is to maintain the horizon straight.

How Can You Preserve the Horizon Straight in a {Photograph}
Let’s see how we are able to obtain this.
There are two fundamental approaches for coping with straight horizons.
- First, be certain that to maintain your digicam straight when taking photographs.
- Second, you’ll be able to handle any crooked horizon later throughout post-processing.
It’s at all times preferable to get it proper within the digicam, however with the advances of modifying packages, we now have loads of instruments to deal with unlevel horizons in Lightroom and different modifying packages.
In my case, I take advantage of a mix of each approaches. I at all times attempt to preserve my horizons as straight as doable when taking the shot however, on the identical time, I do some finetuning in Lightroom with nearly all my panorama photographs.

Retaining the Horizon Straight When Taking pictures
1. Bubble Degree
Earlier than the brand new digital helpers have been launched in digital cameras, the Bubble Degree was the most well-liked and easiest method to verify we stored our cameras straight whereas taking photographs.

A Bubble Degree prices just a few {dollars} and could be connected to the recent shoe of any digicam. The air bubble contained in the gadget serves as an correct indicator of how straight your digicam is. While you see the air bubble within the lifeless heart, you realize you’re able to take the shot.
The Air Bubble technique is efficient and correct when taking pictures on a tripod, however it isn’t very helpful when taking pictures handheld.
I nonetheless have a Bubble Degree laying round, however I hardly use it since now we have a lot better choices out there lately.
2. LCD Gridlines
With the introduction of LCD screens in DSLR cameras, we now have the choice to overlay gridlines on the rear LCD. This was the very first digital helper in images.
Once I shot with a Canon DSLR, I hardly used the gridlines in any respect as a result of I at all times used the Optical Viewfinder to compose the pictures even when utilizing a tripod. I discovered that the rear LCD display was too reflective and didn’t enable me to correctly assess the scene.
3. LCD Digital Degree
The following introduction was the digital stage that you possibly can activate on the rear LCD. The straight traces function a leveling indicator that modifications coloration—usually from pink to inexperienced—when your digicam is completely stage.
I do know many DSLR photographers who use the LCD Digital Degree on a regular basis when composing panorama pictures however, as soon as once more, I by no means used it due to my unique use of viewfinders.
4. EVF Gridlines
With the introduction of mirrorless cameras, it grew to become doable to show every kind of visible aids contained in the EVF together with gridlines.

Once I began taking pictures with the mirrorless Sony, I took full benefit of the gridlines. They have been consistently activated on my Sony a6000 and I used them as the principle information for my composition and for retaining the digicam straight.
5. EVF Digital Degree
When taking pictures with Sony, I didn’t have the Digital Degree characteristic out there, so I used to be not accustomed to it. Once I began taking pictures with the Fujifilm X-T2, which had the EVF Digital Degree, I merely rejected it and handled it as an pointless gimmick.
I solely later realized how efficient it’s. Now, I’ve it activated on a regular basis in order that I can assess the horizon stage when composing my pictures whether or not I’m utilizing a tripod or taking pictures handheld.
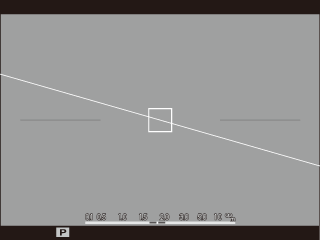
From Fujifilm guide: Deciding on ELECTRONIC LEVEL shows a digital horizon. The digicam is stage when the 2 traces overlap.
With my new behavior of utilizing the Digital Degree within the EVF, I discover that my want for tweaking the horizon stage throughout modifying is minimal.
Fixing an Uneven Horizon in Publish Processing
Everyone knows that it’s higher to stage the horizon when taking the shot however, actually, this isn’t at all times doable. After we fail, Lightroom involves the rescue.
7. The Crop Overlay
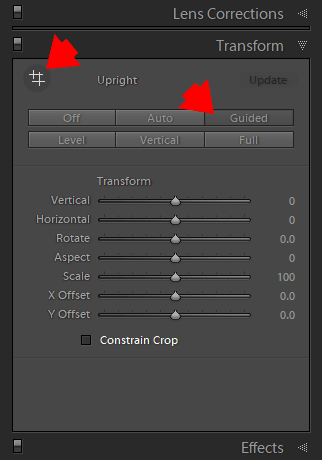
Within the Crop Overlay panel, there are a couple of choices for adjusting the horizons.
You at all times start with the AUTO possibility. On this possibility, Lightroom tries to evaluate the picture and repair it routinely. This works fairly effectively when you’ve gotten open, unobstructed horizon traces. I counsel at all times beginning with the AUTO possibility and, if it doesn’t work, transfer to different choices.

Subsequent, you’ll be able to merely seize any nook of the Crop Boundaries and rotate it. Optionally, you should utilize the Angle Slider to regulate the extent numerically.

The best and quickest approach to regulate the horizon is to make use of the Straighten Instrument. You merely drag the straight line alongside the horizon in your photograph and this system routinely adjusts it. For me, this visible technique is probably the most enjoyable approach to straighten the horizon in a panorama photograph.


8. Lens Corrections
In some instances, even in the event you do every thing proper throughout taking pictures, you’ll be able to nonetheless find yourself with an uneven horizon. In case your lens has a robust barrel distortion, the curvature of the straight traces (together with the horizon line) could be distinguished.

This usually occurs when taking pictures with decrease high quality ultra-wide-angle lenses.
To right the difficulty, you’ll want to use the Lens Correction Panel.
By choosing the Allow Profile Correction possibility, you’ll repair the barrel distortion 99% of the time.
Associated: The right way to {Photograph} and Edit Winter Landscapes
Every digicam producer is aware of the extent of distortion of their lenses at every focal size and it’s simple for them to create the profile for every mannequin. By giving Lightroom directions saved within the profile, it could right the distortion with ease.

However in case Lightroom doesn’t have the appropriate profile to your lens, you’ll be able to at all times manually regulate the distortion.
Bounce to the Guide tab of the Traces Correction Panel and use the Distortion Quantity Slider to visually regulate the curvature.

9. Guided Upright Instrument
Lastly, probably the most superior device of all of them is the Guided Upright Instrument.
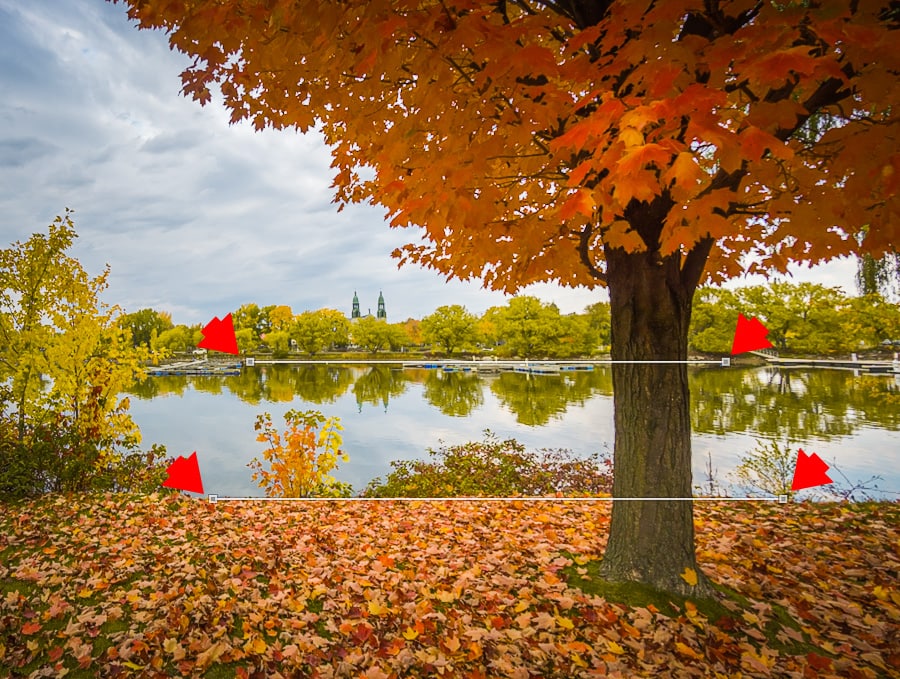
You employ the Guided Upright Instrument when you’ll want to straighten multiple line in your photographs.
For instance, your panorama {photograph} includes a horizon within the background and a river within the middlground. You took a shot of the scenes from an angle and neither the horizon nor the river is completely parallel. Though there’s nothing mistaken with the angle, the river and the horizon are purported to converge based mostly in your place. It doesn’t look fairly proper within the {photograph}.

As a result of the viewer doesn’t see your entire scene (solely what’s included within the body) and doesn’t know the place of the photographer relative to the scene, the photograph appears crooked.
In such instances, the Guided Upright Instrument is the proper resolution. You possibly can drag one information alongside the horizon and one other alongside the river financial institution, which tells Lightroom to align them by distorting the picture.
How Can You Preserve the Horizon Straight in a {Photograph} | Ultimate Ideas
As you’ll be able to see, now we have loads of instruments out there immediately to verify the horizon in our images is at all times straight. It’s as much as you to decide on one device or a mix of instruments to make use of in your workflow.
Use the remark part beneath and let me know the way you cope with straightening the horizon in your images.
Articles Associated to “How Can You Preserve the Horizon Straight in a {Photograph}“
[ad_2]