
[ad_1]
Find out how to make photographs seem like movie in Lightroom is query photographers who observe my web site ask me repeatedly.
Although movie images has skilled a resurgence lately, it’s removed from changing into mainstream once more. However I consider persons are ravenous for nostalgic analog aesthetics of movie images with all its imperfections.
I admit that digital images presents unparalleled benefits. Nonetheless, it typically produces an unrealistic reflection of actuality the place digital photographs look too good, typically too comparable, and don’t have any character.
If you’re not prepared but to embrace analog movie images, I give you a inventive compromise. Use your digital photographs however course of them in Lightroom with analog movie images in thoughts. Create a nostalgic outdated really feel of darkroom processing.
As an alternative of creating a Lightroom movie preset and share with my readers, I made a decision to place collectively a step-by-step information so you possibly can perceive and learn to make photographs seem like movie in Lightroom.
How To Edit Your Pictures Look Like Movie In Lightroom
To make a photograph seem like movie, begin with decreasing distinction and readability within the Fundamental panel. Desaturate heat colours within the HSL panel and shift the colour steadiness utilizing Coloration Gading instruments. For the ultimate contact, add tremendous grain with the assistance of the Impact panel.
In movie images, the ultimate look of the photograph is outlined by the chemical traits of the movie. Over time, hundreds of various kinds of movie had been developed, with essentially the most notable Fuji Velvia, Kodak Ektar, Fujifilm Provia, Kodak Tri-X, Ektachrome, and Kodachrome.
However as we speak, we intention to not create a selected movie’s look however fairly a generic appear and feel that displays analog images.
When creating new presets, I by no means restrict myself to what number of Lightroom changes I exploit and what number of completely different sliders I contain. I exploit as many I as I really feel crucial to realize my desired look. In as we speak’s information, we’ll use the minimal variety of Lightroom changes to create the movie base, the one you possibly can customise and take it so far as your creativity takes you.
Step 1: Cut back Distinction within the Fundamental Panel
One of many foremost variations between digital and analog images is dynamic vary. The fashionable digital sensors produce photographs with a a lot wider dynamic vary than movie.
It’s most evident in panorama images when shooing movie. Due to the narrower dynamic vary, capturing a whole vary of sunshine from the scene is commonly unattainable. Consequently, when capturing movie, you typically see clipped shadows or highlights.
After I begin processing digital photographs in Lightroom, I attempt to maximize their dynamic vary. I do it by cranking up the Highlights and the Shadows sliders, and within the subsequent step, I set black in white factors utilizing the Whites and the Black sliders. It helps protect the broadest dynamic vary and attain most distinction with out clipping highlights and shadows. You will discover a devoted tutorial right here: Setting Black and White Factors in Lightroom.

However we aren’t making an attempt to maximise the dynamic vary and distinction to make photographs seem like movie.
We use the Highlights and the Shadows sliders to scale back the picture’s distinction with out touching distinction devoted controls.

Necessary. At this level is the best time to regulate publicity of your picture. Whether it is overexposed or underexposed, use the Publicity sider of the Fundamental panel to steadiness it. In my case, I didn’t need to do something as a result of I nailed publicity once I took the photograph.
Step 2: Cut back Readability Utilizing Dehaze
At present in digital images, there’s an obsession with picture sharpness. Digital sensors, together with trendy lenses, produce very sharp photographs. On prime, you need to use devoted sharpening applications in post-processing. “Sharpness obsession” typically ends in photographs with an unnatural look.
Movie images has a distinct really feel. The mix of properties of analog movie with older lenses produced a lot softer prints, typically with a dreamy look.
Within the second step, we have to scale back Readability. We are able to do it within the Fundamental Panel.
There are completely different adjustment sliders you need to use to scale back readability. The obvious decisions are the Readability and Distinction sliders. Plus, you possibly can obtain the same impact utilizing the Texture slider.
However, I choose to make use of the Deheze slider. It produces a extra refined impact.
Transfer the Deheze slider to the left (-33).

Step 3: Management Particular person Colours in HSL Panel
On this step, we’ll manipulate particular person photographs’ colours.
The purpose is to desaturate the nice and cozy colours: Crimson, Orange, and Yellow. And to shift the cooler colours: Blue, Aqua, and Inexperienced, towards a hotter spectrum.
We are able to obtain our objectives within the HSL Panel.
Use the Saturation tab to desaturate Yellow, Orange, and Crimson by shifting the sliders to the left.
Use the Hue tab to shift the Blue, Aqua, and Inexperienced. Blue turns into turquoise, Aqua greenish, and Inexperienced yellowish.
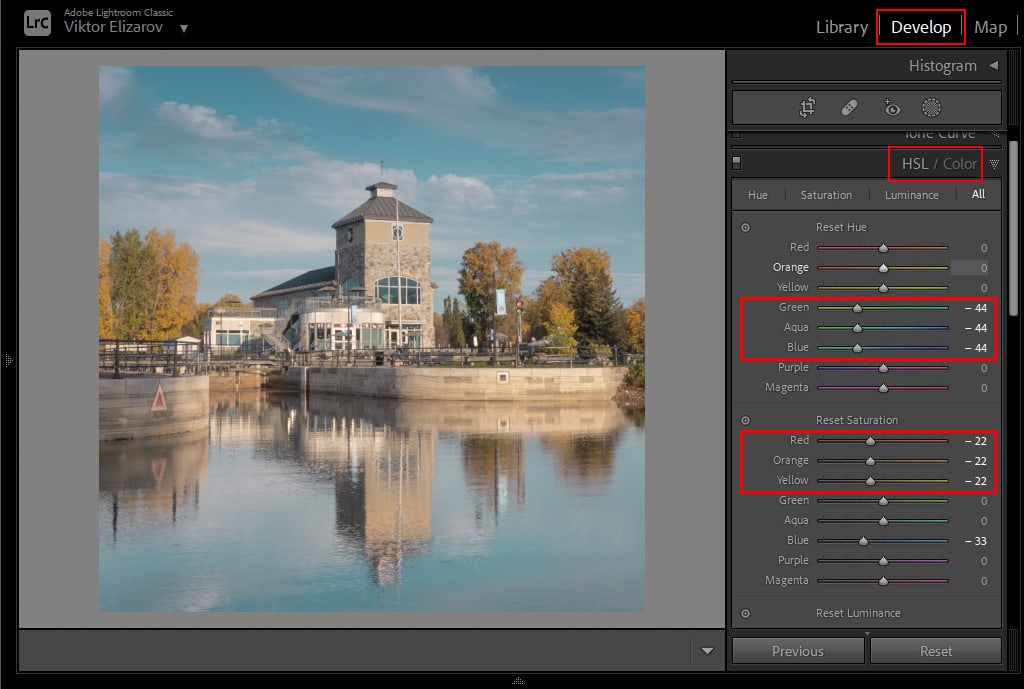
The Luminance sliders management the brightness of particular person colours. The changes listed below are image-dependent. If any of the colours in your photograph is just too brilliant or too darkish, modify Luminance accordingly.
Step 4: Create Cut up Firming Impact within the Colar Grading Panel
The cut up firming is the method of introducing completely different colours to the highlights, the midones, and the shadow areas of the picture. We are able to obtain it through the use of the Coloration Grading panel (formally generally known as the Cut up Firming).
In our case, we’ll add blue colour to the shadows, which is able to make them cooler. And by including the orange colour to the highlights, we’ll make them hotter. And to make it less complicated, we’re going to disregard the Midtones.
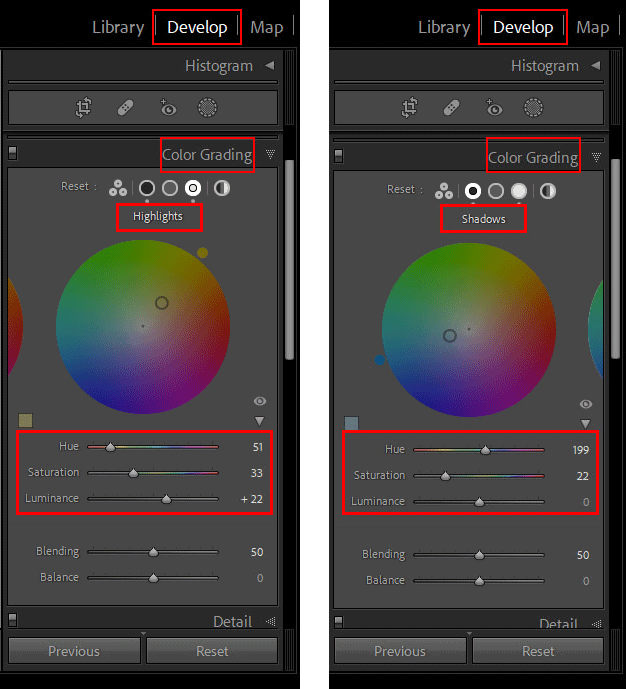
I used very conservative values. However be at liberty to experiment. Shifting the Saturation slider to the best will create a powerful impact.
Step 5: Add Grain Utilizing the Impact Panel
In digital images, now we have noise. It’s extra distinguished within the shadows.
We’ve grain in analog images, which seems primarily within the highlights.
Grain is the fixed property of analog images.
The plastic emulsion of movie is coated with light-sensitive layers of silver halide crystals. Movie emulsion that has layers of crystals coarser and bigger is rated as extra delicate to mild. The bigger grains permit the emulsion to report mild extra shortly. Likewise, movie emulsion rated as having decrease sensitivity to mild has a finer movie grain.
The bigger dimension and coarseness of the movie’s silver halide crystals improve the sunshine sensitivity and ISO pace. It ends in photos with extra grains and lesser saturation.
It signifies that increased ISO movies produce extra pronounced grain. You may management grain properties within the Results panel.
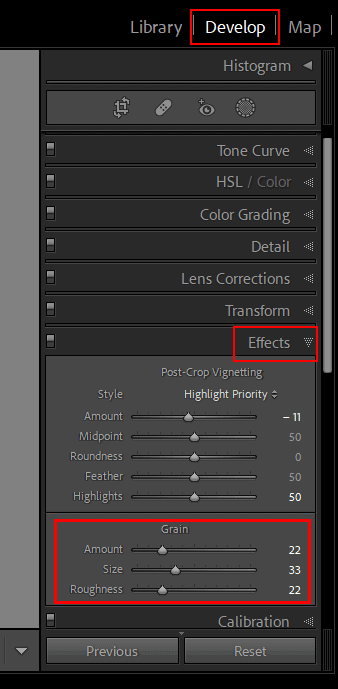
Be happy so as to add extra grain or make it bigger and extra pronounced.
And right here is the ultimate consequence:
Step 6: Customization (Elective)
Since it’s virtually unattainable to develop a common enhancing technique that works with each picture, you’ll more than likely have to customise it.
Begin customization with the HSL panel.
For instance, suppose you edit a panorama photograph with an enormous open sky with predominant blue colours. In that case, you almost certainly might want to scale back the saturation of blues within the Saturation panel.
And in case you have a picture with loads of vegetation, you’ll need to play with Inexperienced, Orange, and Yellow colours within the HUE panel.
Use the Coloration Grading panel by including varied colours to the shadows and the highlights. Additionally, play with the colour depth by adjusting the Saturation slider. It can assist you to create an infinite variety of enhancing variations.
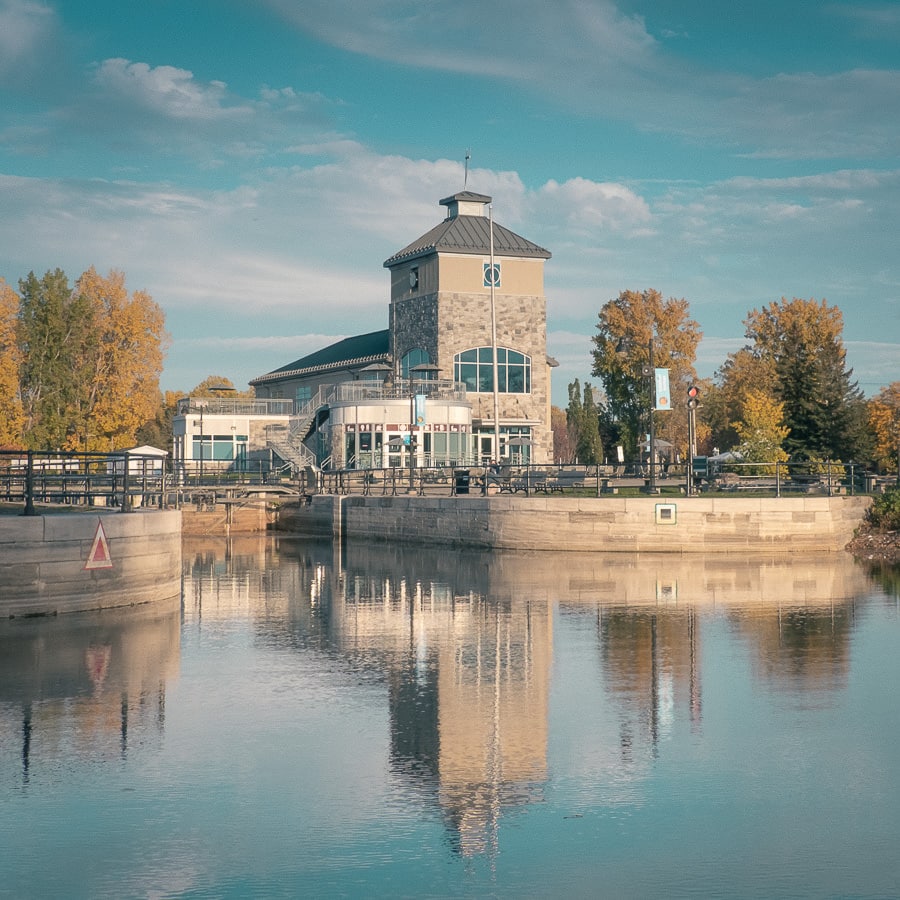
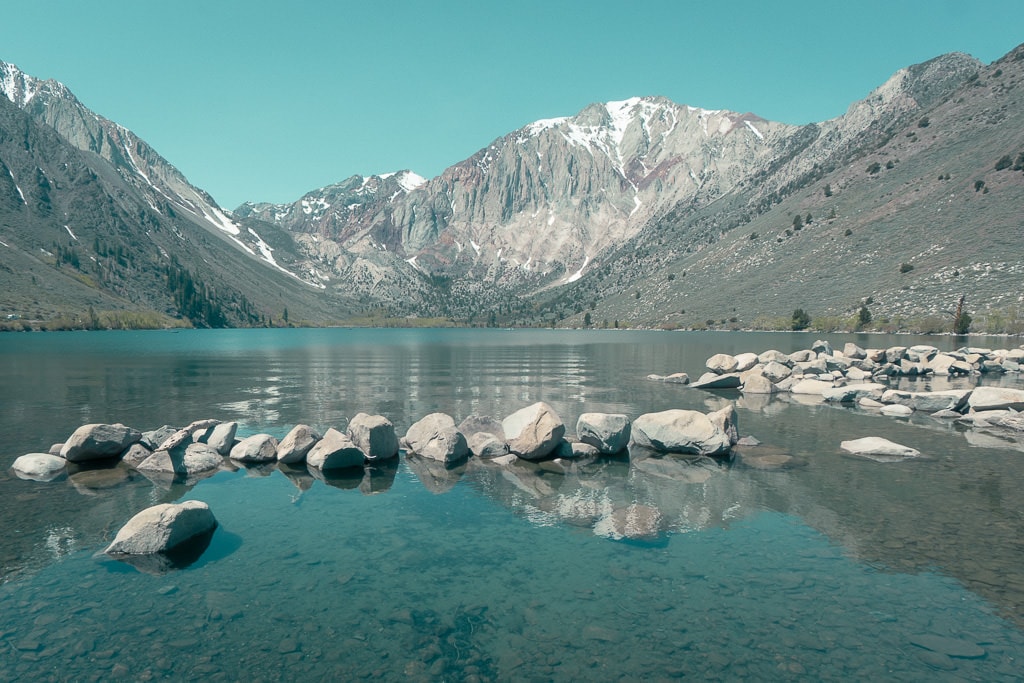
Beneath are some examples of photographs I processed utilizing the “movie look” method I outlined above:


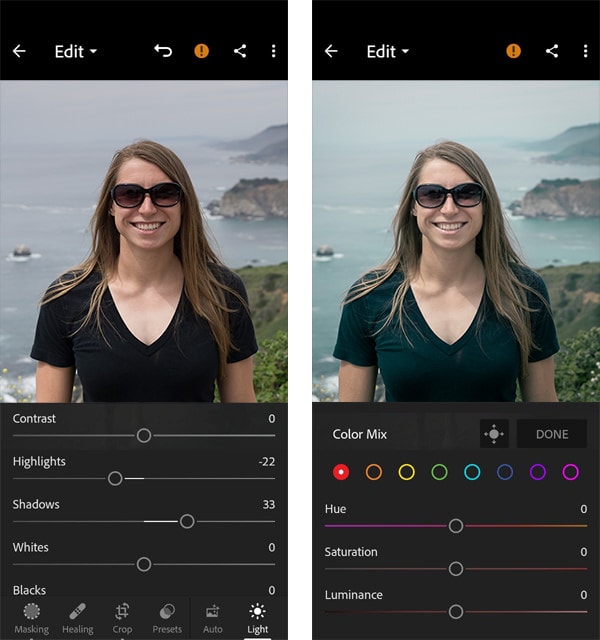
How To Make Pictures Look Like Movie In Lightroom Cell
Making photographs seem like movie in Lightroom Cell is much like the Lightroom Basic. You should use the framework to make photographs seem like movie in Lightroom I coated above to edit photographs in Lightroom Cell.
The Lightroom Cell has equivalent enhancing changes to Lightroom Basic, however in some circumstances, they’re grouped in panels with completely different names.
For instance, there isn’t any Fundamental panel in Lightroom Cell; it’s known as the Gentle panel as an alternative.
You will discover the HSL changes below the Coloration Combine panel in Lightroom Cell.
However the easied technique to realize a movie look in Lightroom Cell is to create Movie Preset in Lightroom Basic, set up it to Lightroom Cell, and reuse it when wanted.
How To Make Pictures Look Like Movie | Remaining Ideas
The purpose of this tutorial is to give you a common technique of “tips on how to make photographs seem like movie.” The enhancing impact you possibly can modify and take even additional by creating completely different variations of the “movie look.”
Articles Associated to “How To Make Pictures Look Like Movie In Lightroom“
[ad_2]