
[ad_1]
Guess what individuals complain about probably the most in Montreal? You might be completely proper, the climate. Right here winters are lengthy and chilly, with frequent violent snowstorms. Spring is nearly nonexistent; it appears that evidently winter transitions into summer season simply in a few weeks. Plus, getting snow in Might will not be an anomaly. Summers are brief and humid. Autumn might be one of the best season right here, however it’s a hit and miss relying on the yr.
This yr it was onerous to complain concerning the climate. The winter was gentle. Even spring was not unhealthy in any respect, which doesn’t occur right here usually. The summer season was lengthy, sizzling, and comparatively dry. The autumn didn’t disappoint as nicely; it was lengthy and dry. However what obtained me excited probably the most was that it was full of colours. It was a welcome change after a number of years of lifeless foliage.
One among my favourite locations for capturing fall foliage is Mont Saint Bruno Nationwide Park, positioned solely 15km from Montreal. It’s comparatively small (9 sq km) however stuffed with small lakes scattered throughout the realm. And are you aware what’s extra thrilling for any photographer than a colourful fall forest? The reflections of colourful fall forest within the calm water of lakes.
I attempt to go to Mont Saint Bruno not less than as soon as each fall; this yr, it was no exception. I spent your complete day mountaineering within the park between the lakes, looking for the right reflections.
And it turned a practice for me to take yet one more picture of the small pedestrian stone bridge surrounded by an explosion of colours.

Capturing
This yr’s fundamental problem was to seek out the spot unobstructed by tall bushes and tree branches. Since I couldn’t discover the best spot, I made a decision to take a wider shot of the scene to crop it later in Lightroom and take away undesirable obstructions in Photoshop.
Earlier than taking the shot, I might see that the sunshine was very dynamic with the intense sky within the background and darkish water within the foreground. Since I used to be not fairly positive if I wanted to bracket my pictures or not, I activated the histogram within the viewfinder of my Fuji XT2 and made positive I might seize your complete vary of sunshine in a single shot.
Beneath is a Histogram from Lightroom. As you possibly can see, the histogram may be very large, however the highlights and shadows should not clipped.


Enhancing & Processing
It was a single RAW processing workflow.
I used my up to date and restructured Fall Colours preset assortment to course of the featured picture.
If you happen to already personal the Fall Colours Preset Assortment, you possibly can obtain the brand new model at no cost. You may log in to the member’s space right here.
Lightroom (50%) – 15min
Step #1 – Cropping
As standard, I began the enhancing course of by addressing the composition. I used the Crop Overlay instrument to make composition tighter. My preliminary intention was to vary the facet ratio from 3:2 to a extra panoramic 16:9 format. However after experimenting, I made a decision to maintain the unique facet ratio.

Step #2 – Lightroom Speedy Enhancing
Subsequent, I moved to my customary preset-based workflow, Lightroom Speedy Enhancing.
I opened the Fall Colours Preset Assortment and experimented with completely different seems to seek out probably the most interesting one.
Listed below are 10 completely different seems I managed to supply:


I made a decision to make use of the Open Sky preset as a basis for my enhancing.
Beneath, you’ll find the screenshot of the brand new, up to date construction of the Fall Colours preset assortment.

Now, every preset has 4 further variations: Hotter, Cooler, Zappy, and Pale.
For instance, I used the Open Sky Cooler variation for my enhancing. After I chosen the Open Sky Cooler preset, I obtained a further enhancing possibility contained in the BASIC panel.

With the assistance of the AMOUNT slider, you possibly can dial up or dial down the “cooling” impact.
In my case, I used the Open Sky Cooler at 44%.
Subsequent, I opened the TOOLKIT and utilized the next changes:
01. Publicity +
10. Open Shadows ++++
32. Vignetting ++
44. Midtone Distinction +++
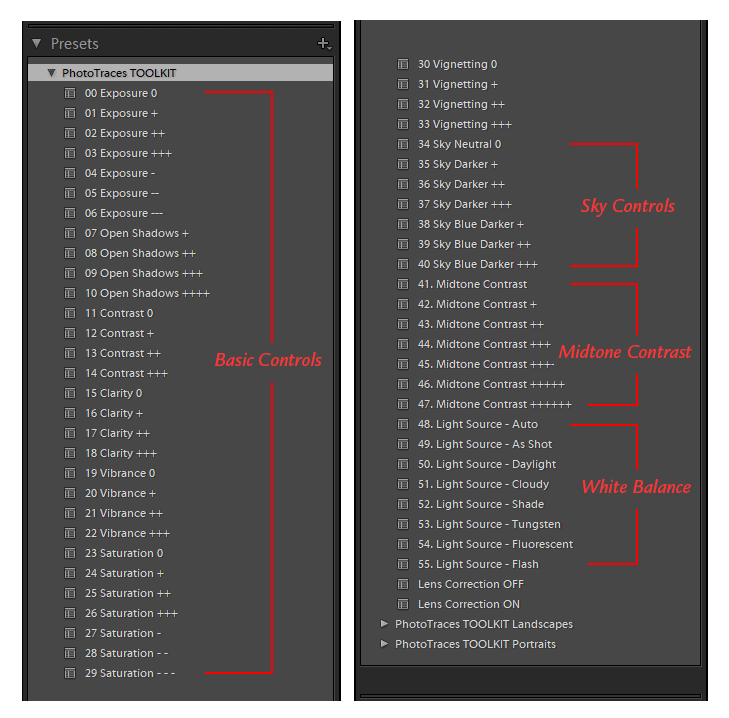
The Enhancing System: Open Sky Cooler 44 (1, 10, 32, 44)
Photoshop (50%) – 15min
Step #4 – Cleansing
It took me a while to take away distractions within the type of tree branches, bushes, and leaves. I used the mixture of the Clone Stamp and Spot Therapeutic Brush instruments.
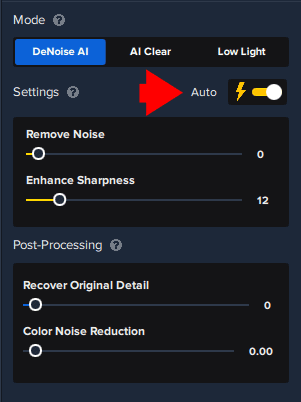
Step #5 – Noise Elimination & Sharpening
Usually, you want 2 completely different instruments to take away noise and one other to extend sharpness, however with the discharge of a model new Topaz DeNoise plugin, you possibly can full each duties in a single step. I used the AUTO settings, and the plugin decreased the noise and elevated sharpness in a single step. Priceless.
To study extra about how I take advantage of Topuz Plugins in my pictures, test right here: Topaz Software program Overview – How I take advantage of Topaz Plugins
Earlier than & After Transformation
The autumn season presents a large number of alternatives for capturing gorgeous foliage images. By following these 12 concepts and suggestions, you possibly can improve your pictures expertise and seize the fantastic thing about autumn in all its glory.

“Fall Colours”
Lightroom Preset Bundle
Lightroom workflow bundle consists of Look Presets, Adjustment Presets, Opacity Presets, Reset Presets, Enhancing Formulation..
[ad_2]