
[ad_1]
Understanding find out how to whiten enamel in Lightroom is important to supply natural-looking portraits.
Whenever you shoot portraits exterior a managed studio atmosphere, you may not often obtain brilliant and color-cast-free enamel straight out of the digital camera.
Usually, the enamel get shaded by the lips and, because of this, get underexposed. As an alternative of brilliant white, they give the impression of being greyish.
Second, the atmosphere produces a shade forged that makes enamel look unnatural. For instance, a sundown creates an orange/yellow shade forged, a brilliant open sky produces a blue shade forged, and blended lighting indoors can produce completely different shade anomalies.
It signifies that even when your mannequin has good white enamel with none stains, you continue to want to the touch them up in Lightroom throughout post-processing.
The purpose of enamel modifying in Lightroom is to brighten the enamel and take away any unnatural shade forged. Fortunately, that is very simple to do.
The best way to Whiten Enamel in Lightroom
Adobe launched a significant replace to Lightroom in October 2021, which brought about a shift in the best way enamel whitening is completed. The Brush Adjustment device, which you can beforehand use for enamel whitening, was renamed to Brush device and moved to the Masking module.
This tutorial will train you find out how to whiten enamel in Lightroom utilizing the brand new brush device to include it into your workflow.
You simply should comply with these subsequent steps:
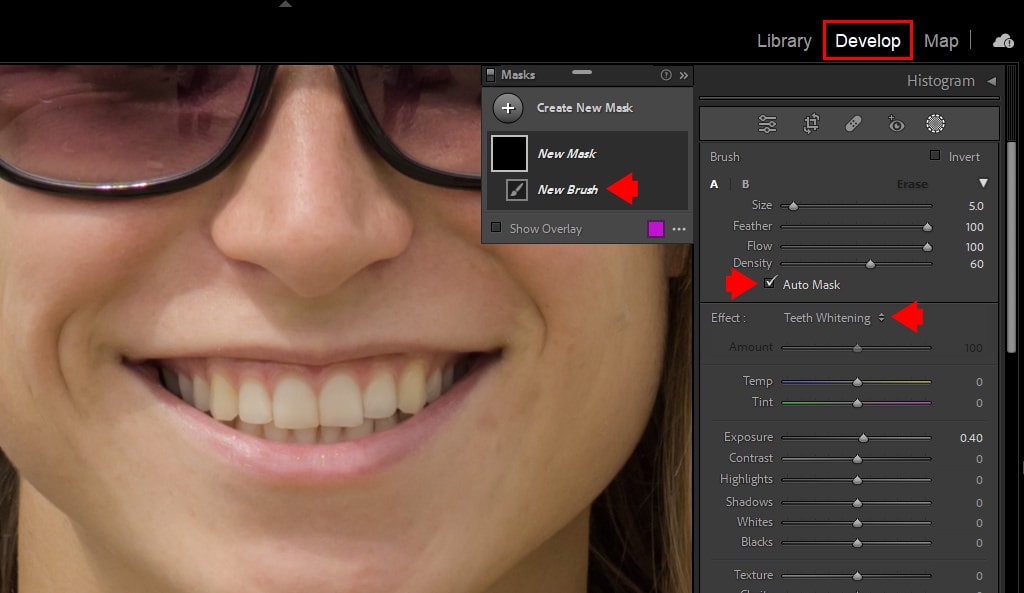
1. Create New Brush Masks
- First, you will need to open a picture in Lightroom.
- Within the Develop module, click on on the Masking Icon. That is located within the high proper bar, which appears like a circle with a dotted define.

- You’ll discover that you’ve got many masking choices accessible. For this explicit edit, it’s a must to select the Brush Icon: Click on on “Brush” – there’s a brush icon proper subsequent to the phrase

- The Brush Panel will come up. Right here, you may see the Masks Panel and a New Masks and New Brush part beneath it. Under are the sliders you’ll be utilizing.

2. Choose the Enamel Whitening Preset From the Impact Menu
- Within the Brush panel, go to “Impact” (beneath the “Brush” space)
- Click on on the drop-down arrow and search for the impact’s title (Enamel Whitening) from the checklist. Choose it.

You’ll discover that Saturation and Publicity are actually set to values applicable for enamel whitening. This preset impacts solely two parameters: Publicity +0.40 and Saturation -60
3. Choose the Auto Masks Possibility
Earlier than going additional and making use of the impact, there’s one other essential step you mustn’t neglect beneath any circumstance. Verify the Auto Masks field. You’ll see it beneath the Brush changes field.

What does Auto Masks do? Primarily, it helps your Brush keep inside the strains when portray. That’s as a result of masking occurs provided that the colour and distinction are comparable. If there’s a distinction between these two, the masking received’t work – that’s, you received’t be capable of apply it.
So in case your fingers are shaky, you don’t ever have to fret about going over the road.
4. Zoom in on the Space of the Enamel
It’s a must to make sure you get most precision and element. That is simply an additional step, albeit one which makes an enormous distinction. The ultimate edit ought to look as pure as potential.
To Zoom in on the enamel:
- Press down the Spacebar and maintain it down
- Click on within the space of the moth
5. Regulate Brush Dimension
Within the Develop module Brush part, go to the Brush field the place your brush changes sliders are, and go to the “Dimension” slider. Play with it till you attain the specified measurement.

Alternatively, you should utilize:
- the shortcuts “[“ and “]” to extend or scale back the dimensions of the Brush
- the mouse wheel to alter the dimensions accordingly
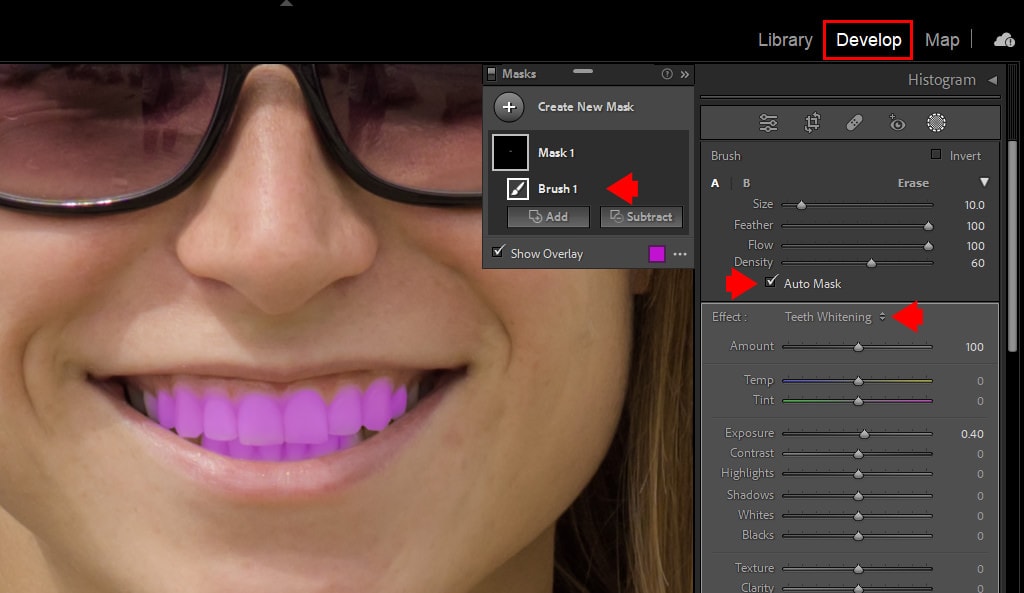
6. Activate Masks Overlay
Usually, Masks Overlay is activated from the beginning. But when that’s not the case, you are able to do it by following these steps:
- Head to the Masks Panel
- Ensure the field subsequent to Present Overlay is ticked – if not, test it your self.

Alternatively, a better solution to activate masks overlay is just by utilizing the shortcut “O” in your keyboard.
*Be aware: You can even select your overlay mode – these modes spotlight the affected areas and may be any shade or opacity you need. To do that, merely click on on the ellipsis picture subsequent to “Present Overlay” and test your desire from the dropdown menu.

7. Begin Portray Over the Enamel
The final step is definitely portray over the enamel.
Drag the Brush alongside the areas that you just need to be whitened. Take your time – the extra you concentrate, the less changes you’ll should make in a while. The Masks Overlay will point out the affected areas.
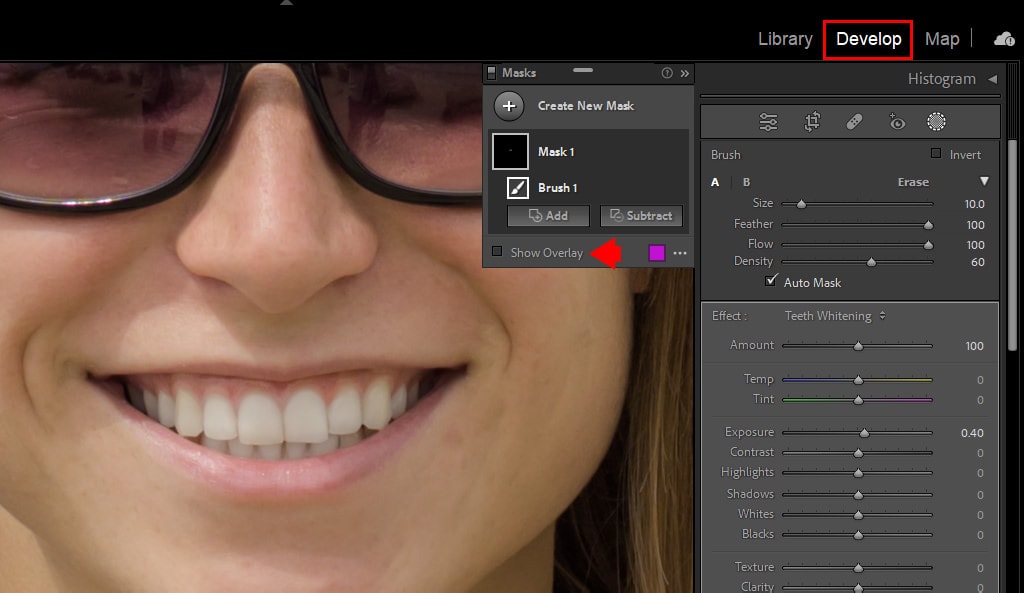
Now that we’ve obtained our enamel lined (actually) let’s take a look at how to make sure the masks is making a distinction. To do that, uncheck Present Overlay within the Masks panel (shortcut “O”) – to see the precise modifications.
Now let’s take a look at what we will do if our masks isn’t correct sufficient. Let’s say it has an excessive amount of protection above the lip—if that occurs, then you could have a few choices:
Undo the final retouch:
- Use the keyboard shortcut “Management + Z” for WINDOWS or “Command + Z” for Mac.
- Go to the highest bar -> Click on on “Edit,” -> click on on “Undo.”
Delete Brush:
- Proper-click the comb picture -> From the menu, go and click on on Delete “Brush 1”
8. Refine the Masks
If which means eradicating any changes you made exterior of the world you wished to have an effect on, it’s a must to subtract from the choice by turning the Brush device into the Eraser brush. Simply comply with these steps:
Head again to the Masks panel > choose Subtract > Brush. Then arrange your brush settings as follows:
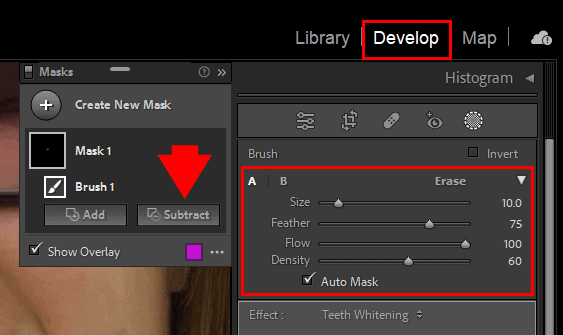
- Ensure your Brush’s measurement is good – if not, you may at all times regulate accordingly.
- You need to ideally set density and Movement to 100
- Feathering needs to be excessive – 75+ is an effective quantity.
Afterward, merely go to the picture and decide the areas you need to subtract from.
9. Change the Power of the Enhancing Impact
- You can also make yet another further change to your impact, and that’s altering the power of the impact of enamel whitening.

10. Last End result
Whenever you disable the Brush Masks, you may preview earlier than & after results.
As you may see, I managed to brighten the enamel and take away the yellow shade forged.

The best way to Whiten Enamel in Lightroom | Conclusion
That’s it. All of the steps are boiled right down to an easy course of. Have your images prepared and comply with the steps above, and also you’ll be capable of whiten anybody’s enamel in Lightroom shortly and superbly. Ensure the ultimate edit doesn’t look synthetic and unrealistic, so play with these sliders at your individual threat!
And don’t neglect to smile!
Articles Associated to “The best way to Whiten Enamel in Lightroom (Step By Step)“
[ad_2]