
[ad_1]
Do you need to know all about ND filters? Are
you struggling to know what impartial density filters can do on your
pictures?
You’ve come to the fitting place.
As a result of on this article, I’m going to present you
every part it’s good to grow to be an ND filter knowledgeable–in order that by the point you’ve
completed, you’ll be capable to confidently choose impartial density filters on your
pictures.
You see, impartial density filters are probably the most
widespread picture filters on the market, even in comparison with widespread choices akin to clear safety
filters, polarizing filters, and extra.
Which is why each photographer ought to
perceive what ND filters are and why they matter.
Let’s get began.
What’s an ND Filter?
All picture filters are designed to switch gentle
earlier than it reaches the digital camera sensor.
As an example, warming filters will make the
gentle seem hotter by filtering out colder colours.
UV filters will scale back the sensor’s publicity
to ultraviolet gentle by filtering it out prematurely.
So impartial density filters have one operate: To scale back the depth of the sunshine.
Slap an ND filter in entrance of your lens, and
your viewfinder will instantly grow to be darker–although the extent of darkness,
and the extent to which all the viewfinder is made darkish, depends upon the
impartial density filter.
Then, once you take a photograph, the shot might be
drastically underexposed, except you make essential adjustments to your publicity
after including the ND filter.
Make sense?
Now, it’s possible you’ll be questioning:
What’s the purpose of including an ND filter in
entrance of the lens? Received’t this simply make it tougher to show correctly
for scenes?
In truth, there are a selection of explanation why you
would possibly need to use a impartial density filter, as I clarify within the subsequent part:
What Does a Impartial Density
Filter Do?
When you’re an skilled photographer, you
know that there are three essential digital camera controls you should use to regulate the
publicity of your pictures:
- Aperture
- Shutter pace
- And ISO
Now, it’s your job as a photographer to seek out
the fitting steadiness between these settings with a purpose to create an ideal publicity.
However typically…
Generally you need to use unconventional
settings for inventive results.
1. ND Filters Assist to Management Movement in Our Pictures
As an example, an extended shutter pace will
improve the movement blur in your images. You’ll be able to go from a shot with frozen
topics–frozen individuals, frozen waterfalls, frozen rain, snow, and clouds–to a
shot with blurred topics, which can provide you fascinating creative results.

You see, with a impartial density filter, you
scale back the quantity of sunshine hitting the sensor–which permits so that you can use a
slower shutter pace with a purpose to compensate for the misplaced gentle. This permits you
to creatively blur water, shifting individuals, and extra.
2. ND Filters Assist to Management Depth of Area
And a wider aperture will will let you create
gorgeous depth of discipline results, the place the background turns into blurry and helps
your topic to face out. Whereas an aperture of f/11 or so will typically hold
your total picture sharp, an aperture of f/2.8 goes to make sure that solely a
sliver of your picture is in focus.
A impartial density filter may will let you
widen your aperture with a purpose to get a creative shallow depth of discipline impact.
When the sunshine is robust, you’ll usually be compelled to shoot at a slender
aperture to create an ideal publicity–however with a impartial density filter, the
energy of the sunshine might be decreased, permitting you to dial in a large aperture.

This is the reason an ND filter is so helpful.
Be aware {that a} vast aperture isn’t simply helpful
for inventive depth of discipline results.
3. ND FIlters Assist to Enhance Picture High quality
A large aperture additionally will increase picture high quality,
as a result of it prevents one thing known as diffraction.
Diffraction is an optical phenomenon that happens once you use a slender aperture;
it’s a consequence of the sunshine waves shifting by means of a really small slit, which
causes the waves to unfold out and intrude with each other.
Put merely, diffraction causes blurring in
your pictures.
And a large aperture prevents diffraction.
Therefore, a impartial density filter may also be
used to mitigate the presence of diffraction in your pictures–with a purpose to hold
issues good and crisp.
One very last thing:
ND filters aren’t simply helpful for nonetheless photographers. Videographers use ND filters, too – with a purpose to management the body price when capturing in vivid gentle, which creates a smoother recording.
Understanding the Energy of ND
Filters
Completely different impartial density filters supply
totally different ranges of sunshine discount.
Some ND filters scale back gentle very barely–whereas
others scale back gentle an in depth quantity.
However how are these variations in filter
energy measured?
Probably the most fundamental measurement used for impartial density filters is stops – that’s, a discount of the sunshine by half.
So a discount of 1 cease halves the quantity of sunshine that hits the sensor.
A discount of two stops reduces the sunshine that hits the sensor by 3/4ths.
A discount of three stops reduces the sunshine that hits the sensor by 7/8ths.
And so forth and so forth.
This could assist clear up a standard
false impression:
{That a} 6-stop ND filter reduces the sunshine all the way down to 1/sixth of its authentic energy, and a ten cease ND filter reduces the sunshine all the way down to 1/tenth of its authentic energy.
That is incorrect.
As a result of every time you lose a cease of sunshine, you’re decreasing the sunshine by half.
So a 6-stop ND filter cuts the sunshine all the way down to 1/sixty fourth of its authentic energy. And a ten cease ND filter cuts the sunshine all the way down to 1/1024 of the unique.
Be aware that impartial density filters will typically
checklist their energy in stops:
1 cease, 2 cease, 3 cease, 6 cease, 10 cease, and so on.

So in the event you seize a 3 cease ND filter, you recognize
that it’ll scale back the sunshine by three stops, also called 7/8ths (as a result of it’ll
halve the sunshine thrice, supplying you with 1/eighth of the unfiltered gentle).
You’ll typically additionally see ND filters labeled with an optical density measurement, akin to 0.3, 0.6, 0.9 or ND2, ND8. Be aware that an optical density of 0.3 corresponds to a single cease of sunshine, so an ND filter with a 0.3 label might be a one-stop ND.
However typically talking, the f-stop measurement
is probably the most helpful, as a result of you’ll be able to simply use it to find out the proper
publicity on your filter. Merely choose the publicity you’d want earlier than including
the ND filter–then drop the shutter pace or widen the aperture to compensate
for the variety of stops the ND filter has decreased.
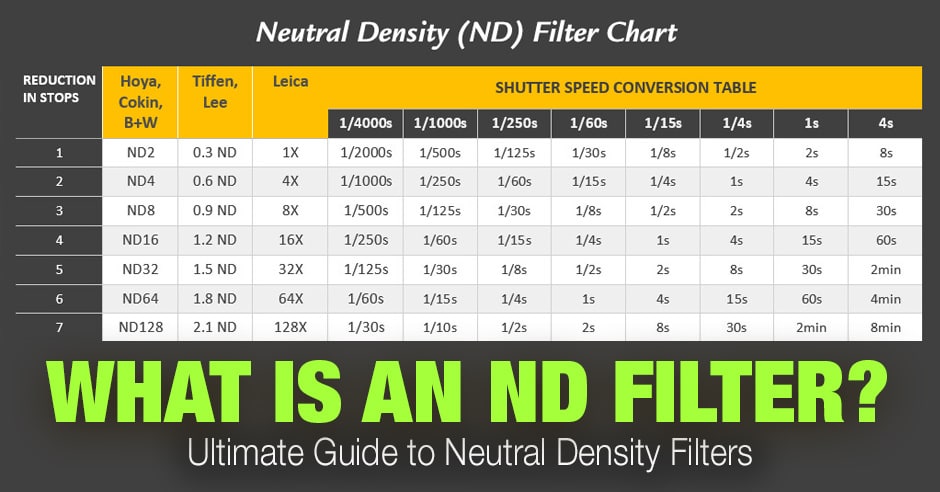
Impartial Density (ND) Filter Chart
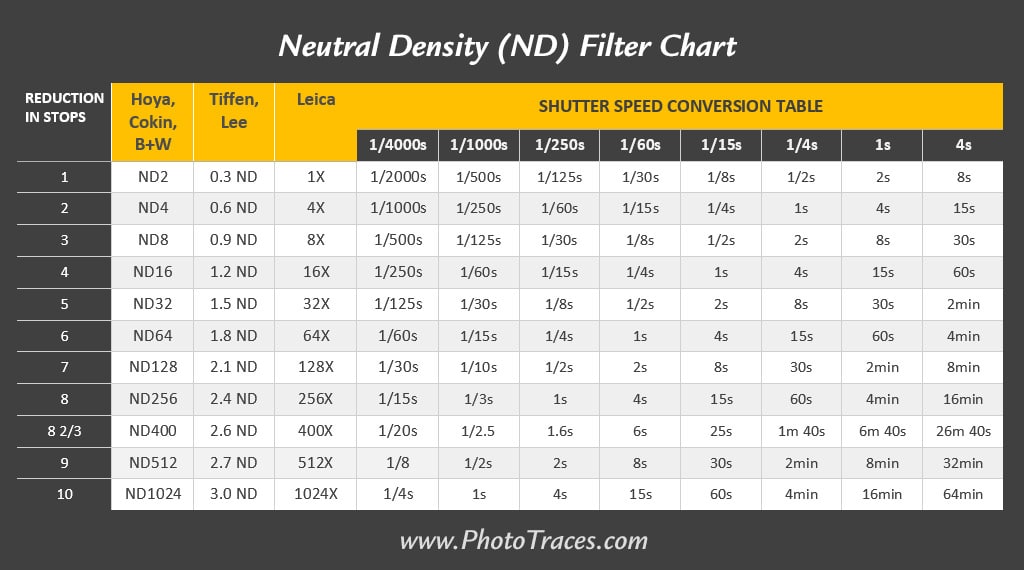
The right way to Use the ND Filter Chart
For instance, in the event you see the next making in your ND filter ND64 or 1.8ND, based on the chart you may have a 6-stop ND filter.
Subsequent, in the event you’re capturing with a shutter pace of 1/250s, however you then add a 6-stop ND filter (ND64), you’ll have to drop the shutter pace down six stops:
from 1/250s to 1/125s (one cease), 1/60s (two stops), 1/30s (three stops), 1/15s (4 stops), 1/8s (5 stops), the place you’ll land at 1/4s (six stops).
Merely establish your publicity previous to utilizing
the filter, then choose the mandatory publicity after slapping in your ND
filter, and also you’re good to go.
Graduated ND Filters Versus Stable
ND Filters
All through this text, I’ve been primarily
speaking by way of strong ND filters:
Filters which can be devoted to decreasing the
gentle by a sure variety of stops throughout all the scene.
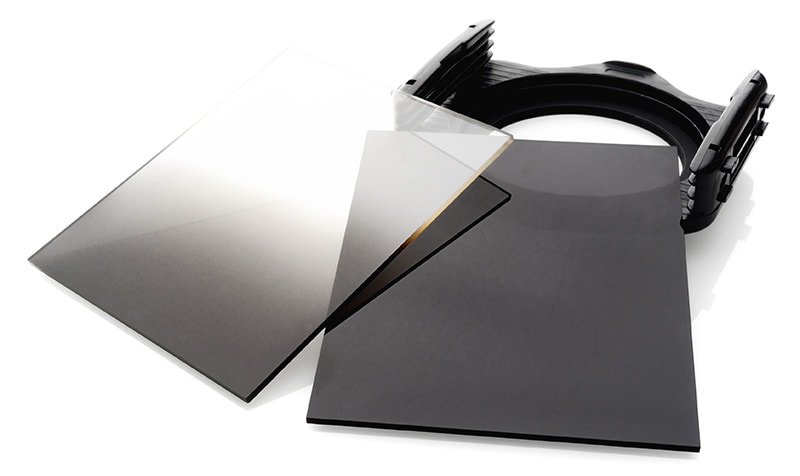
However there may be additionally one other kind of ND filter:
A GND, or a graduated impartial density filter,
which reduces the sunshine in solely a part of the scene, leaving the opposite a part of
the scene to be absolutely uncovered.
That is extraordinarily helpful for panorama
photographers, who typically {photograph} scenes with vivid backgrounds (e.g.,
sunsets) however darkish foregrounds (e.g., rivers and mountains). As a result of cameras
supply restricted dynamic vary capabilities in comparison with the human eye, an
unfiltered publicity of a darkish foreground and a vivid background will lead to
a blown-out background or a drastically underexposed foreground–therefore the necessity
for a graduated ND filter, which reduces the brightness of the sky to a
manageable stage.

Be aware, nonetheless, that advances in
post-processing software program have made impartial density filters pointless. It’s
now potential to take a number of exposures of the identical scene and mix them
collectively utilizing a program akin to Lightroom, Photoshop, or Aurora HDR.
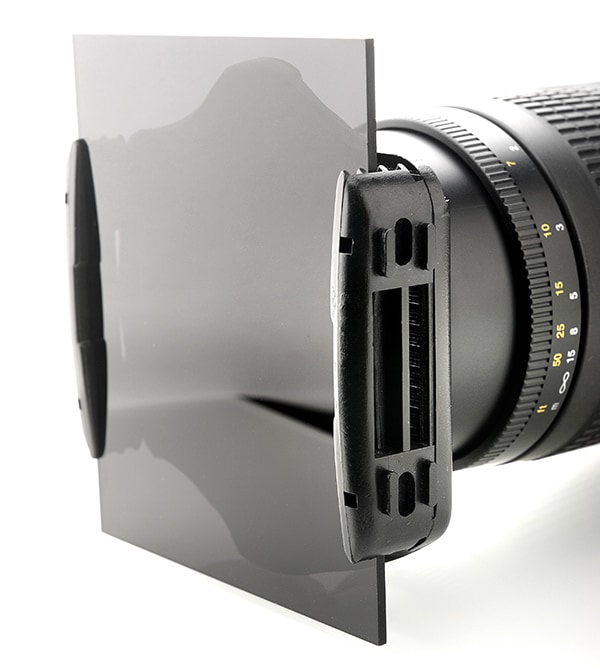
Screw On ND Filters Versus Filter
Holder Kind
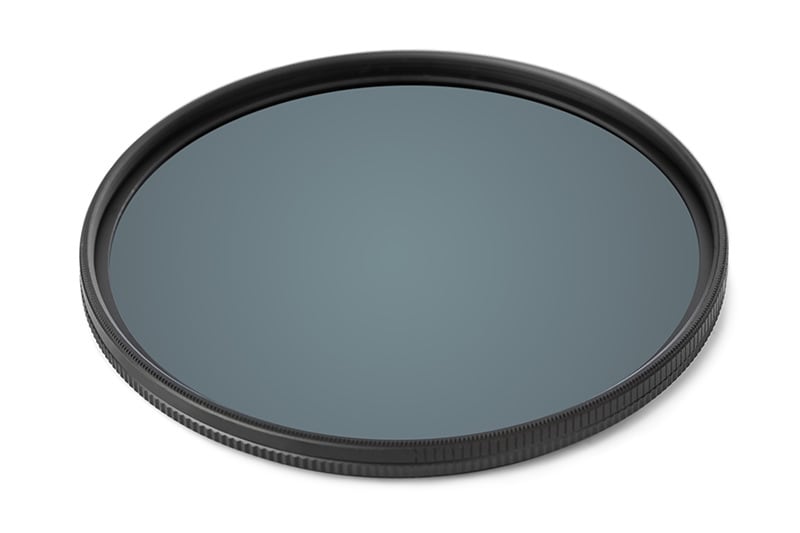
Impartial density filters are available in two types:
Screw-on ND filters and sq. ND filters.
What’s the distinction?
A screw-on ND filter screws straight onto the
entrance of your lens, whereas a sq. ND filter mounts through a lens holder.

Now, in the event you use screw-on ND filters, you’ll
want to purchase an ND filter for each lens you propose to apply it to, assuming the
lenses all have totally different diameters (they usually typically will).
Whereas you should purchase a single sq. ND
filter, then mount it to a number of lenses through the lens holder plus a couple of holder
adapters.
As a result of high-quality ND filters are so costly,
the sq. filter route typically means that you can save a major amount of cash,
assuming you’re in search of a professional-quality equipment. That is very true
in the event you’re planning on utilizing GND filters, as properly–the round GND choice is
fairly restricted, which signifies that high-quality GNDs are a lot simpler to seek out as
sq. choices.
Then again, sq. filter kits typically
value extra up-front, so in the event you simply need to use an ND filter for certainly one of your
lenses, then a round filter might be the best way to go.
Variable Density ND Filter Versus
Fixed Density ND Filter
Relating to buying a screw – on ND filter, you may have two choices:
A relentless ND filter, which reduces the sunshine
a single, predetermined quantity.
And a variable ND filter, which lets you
regulate the energy of the ND filter as you employ it. It really works by utilizing two
filter components joined collectively, in order that twisting the entrance ingredient will increase
or decreases the ND impact.
Fixed ND filters are way more widespread and are usually larger high quality, however variable ND filters are rather more handy. In any case, you should use a single variable ND filter to supply an ND impact from round 2 stops to eight stops – with out having to modify filters on the lens.
When to Use an ND Filter:
Sensible Purposes
ND filters are one of the vital helpful forms of
filters in pictures, and are useful in a variety of totally different situations.
1. Panorama Images
First, ND filters are generally used when
capturing lengthy publicity panorama pictures, particularly in brighter gentle; the ND
impact means that you can keep a sluggish shutter pace, with a purpose to seize
superbly blurred water, clouds, and extra.
2. Portrait Images
Portrait pictures may profit from an
ND filter–in the event you’re aiming for a shallow depth of discipline impact, but it surely’s too
vivid to tug this off, you’ll be able to slap an ND filter onto your lens and widen the
aperture considerably.
3. Wedding ceremony & Occasion Images
Occasion and wedding ceremony photographers use ND filters
for the same objective: To regulate the depth of discipline when capturing group
portraits outside.
4. Videography
Lastly, videographers typically use ND filters
when filming in broad daylight. This helps decrease the body price with a purpose to
produce a smoother video recording.
The right way to Use a Impartial Density
Filter
To make use of a impartial density filter, comply with these
easy steps:
- First, decide your composition–with out the ND filter. And punctiliously focus your lens in order that your picture has the proper level of focus.
- Change your lens over to guide focusing (in the event you weren’t utilizing that already) with a purpose to forestall the lens from shifting the purpose of focus once you take the shot.
- Set your publicity the best way you usually would.
- Add the ND filter to your lens.
- Recalculate the publicity primarily based on the energy of the ND filter; you are able to do this by counting stops in your digital camera, utilizing a chart, or a useful app.
- Then take a shot. In case your picture makes use of a lengthy publicity, be sure to cowl your viewfinder with a chunk of cloth, and even your hand, to forestall gentle leaks.
(Be aware that gentle leaks are solely an issue with DSLRs, so in the event you shoot mirrorless you’ll be able to ignore this recommendation!)
And that’s it! When you’ve adopted these
directions, you’ll find yourself with a lovely picture.
Which ND Filter Ought to You Purchase?
The ND filter you employ depends upon the kind of
pictures you do and your private preferences.
You would possibly begin by buying a couple of screw-on
ND filters, particularly in the event you’ll solely be utilizing them with one or two lenses.
However in the event you’re trying to do plenty of ND filter
work with many lenses, it would make extra sense to seize a lens holder, some
sq. ND filters, and some adapters. This can prevent cash within the lengthy
run!
Be aware that you could stack ND filters to attain
varied filter equivalents; in the event you stack a 3 cease filter and a 6 cease filter,
you’ll find yourself wtih a 9 cease ND. This prevents you from having to buy a
large variety of filters.
ND Filters and Picture High quality
Not all ND filters are created equal.
Whereas some ND filters supply unbelievable
optics…
…others will considerably scale back picture
high quality. The worst ND filters will produce blurry pictures, introduce vignetting,
and add undesirable shade shifts.
Be aware that shade shifts are current even in
high-quality ND filters at larger strengths. That is one thing you’ll be able to cope with
in post-processing–merely shoot in RAW, then regulate the white steadiness in
Photoshop or Lightroom.
However not all ND filters trigger blurring or
vignettes. As with lenses, you get what you pay for–so don’t skimp on filter
high quality and buy low cost choices off of eBay.
As a substitute, you should purchase ND filters that match
your expectations!
ND Filter Chart: Conclusion
Now that you just’ve completed this text, you
know all about ND filters.
You understand the distinction between graduated
impartial density and impartial density filters.
You understand how to make use of an ND filter for gorgeous
pictures.
And you know the way to choose ND filters.
So seize some ND filters and begin capturing.
You’ll love the outcomes!
Articles Associated to “What’s an ND Filter? Impartial Density (ND) Filter Chart“
[ad_2]