
[ad_1]
You’ll have puzzled what’s an XMP file and – extra importantly – the way it works. Typically this may be arduous to grasp, so we’re right here to clear the fog.
An XMP file is a compressed container for metadata supported by apps similar to Adobe Photoshop, Lightroom, and others. However that’s slightly obscure, so let’s get extra particular!
What’s an XMP File?
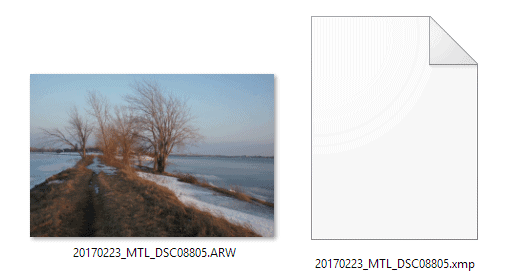
XMP stands for Extensible Metadata Platform. An XMP file (additionally known as a sidecar file) preserves any extra metadata utilized to that file. This permits the knowledge to be saved individually and keep intact between gadgets.
To exemplify: in a picture enhancing app, the edits you make are utilized to a RAW file (the picture that comes instantly out of your digicam). These edits are saved in a separate sidecar file or inside a catalog (e.g., Lightroom catalog).
Lightroom can solely retailer enhancing information in a catalog or XML file as a result of it doesn’t have entry to proprietary RAW information.
In a nutshell:
An XMP file is a metadata file that shops the settings you utilized to a photograph in apps like Adobe Lightroom or Photoshop. This info inside an XMP file contains:
- EXIF info – digicam settings (publicity information like aperture, iso, and shutter pace), time, date, and key phrases that describe the file.
- Edit info – changes made to publicity, white steadiness, and shade saturation, in addition to another adjustments you made to the photograph’s look
XMP information could be edited extra simply – that’s, with out altering the unique file. They’re excellent once you need to protect your edits, like once you collaborate with different photographers and need to ship a sidecar file, in order that they see the adjustments you made to a picture.
This information is often embedded in sure information, similar to open format photographs like JPEG, PNG, GIF, and TIFF.
I Do Not See XMP Information in My Library
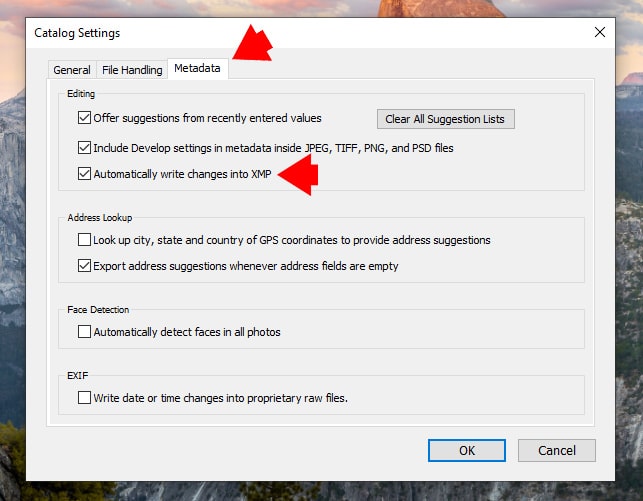
By default, Lightroom embeds XMP info inside Lightroom Catalog with out producing XMP sidecar information. If that’s the case, you could allow this perform in Catalog Settings.
Methods to allow XMP sidecar information in Lightroom:
- Within the prime toolbar, you possibly can see the tab Edit (“Lightroom Basic” on Mac) – click on on it
- From the dropdown menu, choose the “Catalog Settings” choice
- Click on on the “Metadata” tab
- Test the “Routinely write adjustments into XMP” field
If you wish to disable this function, return to “Catalog Settings” and uncheck “Routinely write adjustments into XMP.”
For those who’re working with RAW information and have this perform turned on, Lightroom will mechanically write enhancing directions to the .xmp file every time you edit the chosen picture – which means it’s going to try this at each slider you progress in Lightroom.
Utilizing XMP sidecar information is nice if you wish to protect your enhancing information in case your catalog will get corrupted. Additionally, XMP information take up little or no house in your arduous drive. Nonetheless, it slows down Lightroom!
Finally, it’s as much as you to decide on which choice works greatest for you.
XMP Information and Lightroom Develop Presets
Earlier than, Lightroom had restricted enhancing capability and solely allowed for RAW file managing. The Lightroom Develop Preset aimed to make enhancing as accessible as doable, enabling non-destructive enhancing.
What’s Non-destructive Enhancing?
You’ll see a bunch of RAW and XMP information with the identical title piled collectively in your arduous drive. RAW information are taken out of your digicam – they don’t have any information hooked up to them. XMP information are metadata information: the knowledge saved in them contains EXIF information and any enhancing you may need accomplished in apps like Lightroom.
When enhancing RAW information In Lightroom, all of the adjustments are saved within the XMP file. For instance, if you happen to transfer a slider in Lightroom, you possibly can see the edits you made with that slider within the sidecar file (the XMP file). So if you happen to learn it in a textual content editor, you’ll see these edits you made introduced as enhancing directions.

As you see, you possibly can edit any picture by altering the values contained in the XMP sidecar and with out touching Lightroom sliders. After all, it could not be sensible.
All these edits you make are remodeled right into a JPEG preview with all of the adjustments within the app. The RAW file stays unaltered this complete time.
Sidecar vs Preset
Once you need to save edits utilized to the chosen picture as a preset, Lightroom takes all enhancing directions from sidecar and saves them as Develop Preset utilizing the XMP file format.
In a nutshell, the Lightroom develop preset is similar XMP sidecar file with a special perform.
Once you apply the develop preset to the picture, the enhancing directions might be copied from the preset in XMP format to the sidecar XMP file; Lightroom then reads this file and generates a preview with all these values.
Having a sidecar file permits edits to be shared between apps. For instance, you can begin enhancing a picture in Lightroom, proceed in Photoshop, and ship it over the cloud in Lightroom Cell – with out shedding any enhancing information.
Methods to Open XMP Information in Lightroom?
There isn’t any technique to open the XMP file in Lightroom. This system manages all XMP information mechanically with out you having to do something.
However you possibly can open the XMP file exterior Lightroom.
If you wish to see or change the knowledge inside an XMP file, you possibly can open it utilizing a textual content editor:
- Go to a textual content editor, like Notepad++
- View or edit the XMP file as a textual content file

*You should use textual content editors if you wish to duplicate presets, as Lightroom doesn’t have this function. Simply duplicate the preset within the file browser and alter the title contained in the XMP file so Lightroom can see it.
Producing XMP Information on Demand
If you wish to share a RAW file with all of the edits, you possibly can embrace a sidecar file subsequent to it. You additionally won’t need Lightroom slowing issues down by writing .xmp information each time – perhaps you need to depart this option to you.
Methods to create one XMP file:
Edit your photograph and hit the “Ctrl-S” (Command-S on Mac) keyboard shortcut. Lightroom will create a separate .xmp sidecar file with all of your adjustments.
Different to XMP information:
There’s additionally a method round this. You’ll be able to create a DNG file, so that you don’t need to ship each an XMP and a RAW file – all the knowledge might be embedded on this one DNG file.
Methods to convert a photograph do DNG file format:
- Go to the Library module.
- Under the Library menu within the higher toolbar, choose ‘Convert Photograph to DNG.’
Finally, you possibly can export a photograph as a DNG picture, and all XMP info might be embedded contained in the DNG picture.
What’s an XMP File? | Ultimate Ideas
At its most elementary stage, an XMP file is a sidecar file containing extra details about a picture. However as we’ve seen, there’s rather more to XMP information than meets the attention.
Now that you realize every thing about XMP information, it’s as much as you to resolve if you wish to use them repeatedly in your enhancing workflow or simply each on occasion.
Articles Associated to “What’s an XMP File? Making Sense of Lightroom Sidecar Information“
[ad_2]